Friday, April 29, 2011

Make Any Folder as a Photo Folder

'This tricks shows you how to setup any folder to display its contents as a photo folder. In many cases, you save your images/photos in a folder different than "My Pictures" (under "My Documents"). Since this folder you choose is just like any other normal folders, its contents displayed as a listing of files. You can temporary change it by just right-click and select "View" >> "Thumbnails". But if you want to change the folder so that everytime you come back, the folder itself, as well as all its subfolders, display the contents as photo thumbnails.

Here is trick...

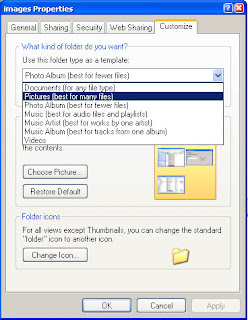
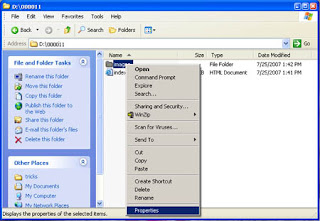
Right-click on the folder you choose and select "Properties"
Make Folder as a Photo Folder
 Select "Customize" Tab. Then under "Use this folder type as a template", select "Pictures (best for many files)"
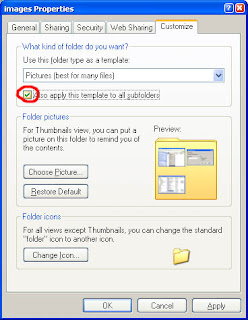
Make Any Folder Photo Folder
 Check on "Also apply this template to all subfolders" to apply the setting to subfoders as well
Make Photo Folder
Add caption
                  Click OK to exit  ....And now rady your Photo Folder
                  ***===***                                                                                                                                

Sunday, April 24, 2011

Microsoft Windows Shortcut keys


Basic For Windows Shortcut keys


Windows xp Shortcut Keys
Win - Press windows key to open start menu
Win+R Apply to open Run dialog box
Win+M Apply to minimize all opened windows
Win+Shift+M Apply to maximize all opened windows
Win+L Press keys to lock keyboard in windows XP
Win+E Press keys to open My Computer
Win+F Apply to open search options
Win+U Apply keys to open Utility Manager
Win+D To view desktop/minimize all windows
Win+F1 To view the detail windows help page
Win+Pause To view the System Properties dialog box
Win+Tab Move through taskbar programs
Win+F+Ctrl Apply to open search for computers
Alt+Tab Move through opened windows programs
Alt+F4 Press keys to close active windows program
Alt+Enter Apply to open properties of selected item
Alt+ SPACEBAR Open the system menu of active window
Alt+ SPACEBAR +N Press keys to minimize the active program
Alt+ SPACEBAR +R Press keys to restore the active program
Alt+ SPACEBAR+C Press keys to close the active program
Alt+ SPACEBAR+X Press keys to maximize the active program
Alt+ SPACEBAR+M Press keys to move the active program
Ctrl+Alt+Delete Apply to open windows task manager
Ctrl+Shift+Esc Apply to open windows task manager
Ctrl+Esc Press keys to open start menu
Shift Shift key to prevent CD from automatically playing
Shift+Delete To delete items permanently

Friday, April 22, 2011

Password Recovery Disk

Take preventive measures against losing user-level passwords.
It doesn't matter if you never again remember a Windows user password. Thanks to XP's Forgotten Password Wizard, your conscience will be free and clear -- should your mind happen to accidentally misplace your user password.

I highly suggest you create a password recovery disk the minute you create your user account. Why? In order to create a password recovery disk you're going to need your password. Write it down the minute you create your user account and then proceed to creating your very own password recovery disk.

    Here's how to launch the Forgotten Password Wizard:

    Single-click Start menu, Control Panel, and User Accounts.
    Click your user account name.
    Under Related Tasks on the left, click "Prevent forgotten password" to launch the wizard.

Now that you've launched the wizard, let it walk you through creating the recovery disk. Make sure the disk you use is formatted and in the drive. After it's finished creating the disk, label it and stash it away for an emergency.

If you happen to forget your password, all you need to do is click your user icon at the logon screen. Even though you don't have your password, go ahead and click the green arrow just like you would to finish logging on to your computer. This will launch a little yellow dialog box directing you to use your 'password recovery disk'
***===***

Wednesday, April 20, 2011

More Icons Fit on Your Desktop

If your screen is so cluttered with Word documents and program shortcuts that you can't see the rolling meadows of your wallpaper, you don't need to move piles of stuff to the Recycling Bin. Just change the amount of space between icons. Right-click on the desktop, select Properties, then click on the Appearance tab, and click the Advanced button. In the "Item" drop-down, scroll down to Icon Spacing (Horizontal) and Icon Spacing (Vertical); changing the value in the "Size" field will move icons closer together
(while increasing the number will move them farther apart).
When you're done, click OK.
To make your existing icons follow these rules, right-click on the desktop, select "Arrange Icons By" and then click Align to Grid, then go back to the same menu and click "Auto Arrange.
***===***

Tuesday, April 19, 2011

Provide Remote Assistance When Using a NAT Device

You can provide Remote Assistance to a friend who uses a Network Address Translation (NAT) device by modifying the Remote Assistance invitation using XML. Network Address Translation is used to allow multiple computers to share the same outbound Internet connection. To open a Remote Assistance session with a friend who uses a NAT device:

  • 1. Ask your friend to send you a Remote Assistance invitation by e–mail.
  • 2. Save the invitation file to your desktop.
  • 3. Right–click the file, and then click Open With Notepad. You'll see that the file is a simple XML file.
  • 4.Under the RCTICKET attribute is a private IP address, such as 192.168.1.100.
  • 5. Over–write this IP address with your friend's public IP address. Your friend must send you his or her public IP address: they can find out what it is by going to a Web site that will return the public IP address, such as http://www.dslreports.com/ip.
  • 6. Save the file, and then double–click it to open the Remote Assistance session.

    Now, you'll be able to connect and provide them with the help they need. So that your inbound IP connection is routed to the correct computer, the NAT must be configured to route that inbound traffic. To do so, make sure your friend forwards port 3389 to the computer they want help from.

Sunday, April 17, 2011

How To Disable CD Autorun Function In Xp

        ( How To Disable CD  Autorun  Function In  Xp )
  •  1_ Click Start, Run and enter GPEDIT.MSC
  • 2_ Go to Computer Configuration, Administrative Templates, System
  • 3_ Locate the entry for Turn autoplay off and modify it as you desire
  • 4_It's Done.....

Saturday, April 16, 2011

Top Great Wallpaper-604

Top Great Wallpaper-604
Download Link_Click Hear
                                                        

Friday, April 15, 2011

Thursday, April 14, 2011

Fix your Slow XP and 98 Network

(Network Fix)
You can run "wmiprvse.exe" as a process for quick shared network access to Win98/ME machines. Stick it in Startup or make it a service.

    "On the PC running XP, log in as you normally would, go to users, manage network passwords.
    Here is where the problem lies. In this dialog box remove any win98 passwords or computer-assigned names for the win98 PCs. In my case , I had two computer-assigned win98 pc names in this box (example G4k8e6). I deleted these names (you may have passwords instead). Then go to My Network Places and -- there you go! -- no more delay!

    Now, after I did this and went to My Network Places to browse the first Win98 PC, I was presented with a password/logon box that looked like this: logon: G4k8e6/guest (lightly grayed out) and a place to enter a password. I entered the password that I had previously used to share drives on the Win98 PCs long before I installed XP. I have the guest account enabled in XP.

 This solves the problem for Win98 & XP machines on a LAN; I can't guarantee it will work for Win2K/ME machines as well, but the whole secret lies in the passwords. If this doesn't solve your slow WinXP>Win98 access problems, then you probably have other things wrong. Don't forget to uncheck 'simple file sharing,' turn off your ICS firewall, enable NetBIOS over TCP/IP and install proper protocols, services & permissions.
***===***

Wednesday, April 13, 2011

How to Remove Windows XP's Messenger

The oretically, you can get rid of it (as well as a few other things). Windows 2000 power users should already be familiar with this tweak..........
Fire up the Windows Explorer and navigate your way to the %SYSTEMROOT% \ INF folder. What the heck is that thingy with the percentage signs? It's a variable. For most people, %SYSTEMROOT% is C:\Windows. For others, it may be E:\WinXP. Get it? Okay, on with the hack! In the INF folder, open sysoc.inf (but not before making a BACKUP copy first). Before your eyes glaze over, look for the line containing "msmsgs" in it. Near the end of that particular line, you'll notice that the word "hide" is not so hidden. Go ahead and delete "hide" (so that the flanking commas are left sitting next to one another). Save the file and close it. Now, open the Add and Remove Programs applet in the Control Panel. Click the Add / Remove Windows Components icon. You should see "Windows Messenger" in that list. Remove the checkmark from its box, and you should be set. NOTE: there are other hidden system components in that sysoc.inf file, too. Remove "hide" and the subsequent programs at your own risk
***===***

Tuesday, April 12, 2011

AVI File Fix in Windows XP

If you have any 'AVI ' files that you saved in Windows 9x, which have interference when opened in Windows XP, there is an easy fix to get rid of the interference: Open Windows Movie Maker. Click View and then click Options. Click in the box to remove the check mark beside Automatically create clips. Now, import the movie file that has interference and drag it onto the timeline. Then save the movie, and during the re-rendering, the interference will be removed.

Monday, April 11, 2011

Install/Enable NetBEUI Under WinXP

If for some reason you need to install NetBEUI then follow these instructions.
Note: You will need the WinXP CD in order to to this!

Support for the NetBIOS Extended User Interface protocols (also called NetBEUI or NBF) in Windows XP has been discontinued. If your configuration requires temporary use of NetBEUI for Windows XP, follow these steps:

To install the NETBEUI protocol:

- Locate the Valueadd/msft/net/netbeui directory on your Windows XP CD.Copy nbf.sys into the %SYSTEMROOT%SYSTEM32DRIVERS directory.

- Copy netnbf.inf into the %SYSTEMROOT%INF directory.

- In Control Panel, click Network and Internet Connections and then click Network Connections.

- Right-click the connection you want to configure, and then click Properties.

- On the General tab, click the INSTALL button to add the NetBEUI protocol.


Saturday, April 9, 2011

Kab Se Apni Talash Main Gum Hoon

Kab Se Apni Talash Main Gum Hoon
Nasi Kazmi
Kab Se Apni Talash Main Gum Hoon

Speed up your browsing of Windows 2000 & XP machines

Here's a great tip to speed up your browsing of Windows 2000 & XP machines. Its actually a fix to a bug installed as default in Windows 2000 that scans shared files for Scheduled Tasks. And it turns out that you can experience a delay as long as 30 seconds when you try to view shared files across a network because Windows 2000 is using the extra time to search the remote computer for any Scheduled Tasks. Note that though the fix is originally intended for only those affected, Windows 2000 users will experience that the actual browsing speed of both the Internet & Windows Explorers improve significantly after applying it since it doesn't search for Scheduled Tasks anymore. Here's how :

    Open up the Registry and go to :

    HKEY_LOCAL_MACHINE/Software/Microsoft/Windows/Current Version/Explorer/RemoteComputer/NameSpace

Under that branch, select the key :

    {D6277990-4C6A-11CF-8D87-00AA0060F5BF}

and delete it.

This is key that instructs Windows to search for Scheduled Tasks. If you like you may want to export the exact branch so that you can restore the key if necessary.

 This fix is so effective that it doesn't require a (reboot) and you can almost immediately determine yourself how much it speeds up your browsing  processes.

Friday, April 8, 2011

Saza ye di ankhon se chheen li nendain

khawab
Saza ye di ankhon se chheen li nendain
quoor ye tha jeenay kai khawab dekhay thay
jeenay kai khawab dekhay thay

Wednesday, April 6, 2011

Set the Search Screen to the Classic Look

To Set the default Search Screen in Windows XP to its classic look.
Just follow the following steps.

1* Open your Registry editor:
Start>Run>and type “regedit” with out the the ” ” and press OK .
You will see following window

2* Now Navigate it to:
HKEY_CURRENT_USER Software Microsoft Windows CurrentVersion Explorer CabinetState.

3* Create a new string value labeled “Use Search Asst” and set it to “no”.

Air Force Missions

Air Force Missions
 
Air Force Missions 
Download link Click Hear

Tuesday, April 5, 2011

Speed up menu display

       Speed up menu display!

  • Click Start. Right-click My Computer, and then click Properties
  • Click the Advanced tab. In the Performance area, click Settings
  • On the Visual Effects tab in the Performance Options dialog box, clear the Fade or slide menus into view check box
  • Click OK.
  • In the System Properties dialog box, click OK.Now when you click a menu, it will appear almost instantly.

Carom3D v5.03

Carom3D v5.03
 
Carom3D v5.03 
Download link Click Hear

Monday, April 4, 2011

make your Desktop Icons Transparent

You can make your 'desktop icons' transparent by following these steps:
  1. Click on Start menu button.
  2. Select Control Panel. (Set your option to display in Category View, for this click Switch to Category View on let top corner of window.)
  3. Select System to open System Properties window.
  4. Select Advanced tab.
  5. In Performance section, click Settings button.
  6. Here in Performance Options window, choose Visual Effects tab.
  7. Here in list, uncheck the option Use drop shades for icon labels on the Desktop.
  8. Click Apply and Ok buttons.

Police Super cars Racing

Police Super cars Racing
 
Police Super cars Racing 
Download link Click Hear

Sunday, April 3, 2011

Road Attack

Road Attack
 
Road Attack 
Download link Click Hear

How to use Windows Update Properly

If you want to save your files to your hard drive, so after a format you dont have to download them all again......here's How:

/ Logon to Windows Update

/ Choose Windows Update Catalogue (left hand pane)

/ Choose Find updates for Microsoft Windows operating systems (right hand pane)

/ Choose your version and language then Search

/ Choose one the following:

/  Critical Updates and Service Packs
/  Service Packs and Recommended Downloads
Multi-Language Features (0)


/  Once chosen simply click on what you want to download and then back at the top click Review Download Basket

/ You are taken to the next page where at the top you can specify where the downloads are to be saved.

/  Click Download now. Each patch will make a directory under the root of the folder you saved them to.
    Once finished you need to go to where you saved the file (s) to and then simply install all your patches.

Saturday, April 2, 2011

Create Windows shutdown shortcut

  • Right click on an empty area on your desktop.
  • Select New>Shortcut.
  • In the first box of the Create Shortcut Wizard, type : Shutdown -s -t 00
  • Click Next. Name the shortcut : Shutdown , and click Finish.
  • Then select an appropriate icon for it !
Create a RESTART icon:
  • In the first box of the Create Shortcut Wizard, type : Shutdown -r -t 00
  • Click Next. Name the shortcut : Restart , and click Finish.
  • select an appropriate icon for it now !
Create A SUSPEND shortcut:
  • In the Create Shortcut wizards location text box appears, type: rundll32.exe PowrProf.dll, SetSuspendState
  • Give the shortcut a name like Hibernate.

Friday, April 1, 2011

Computer Maintenance Is Necessary For Healthy Computer

By_Jon Kercinik:
.........................
Whether we are a computer lover or a computer hater, one thing is for sure. When we are using a computer, we want it to work and work well. How frustrating it is when we are working on the computer and all of a sudden it slows down to a crawl, or it becomes unstable to the point where we have to reboot the system, possibly losing any unsaved work. Experiences like these cause the birth of many computer haters. So how can we use our computers to in a way that will help minimize these unwanted situations? What actions can we take to help our computer age gracefully? Good computer maintenance is absolutely necessary if our computer is to be useful for its whole life. What are some ways to keep our computer up and running fast?

One way, and probably the most important, is to install proper anti-malware software on your system. It should be a program that can not only search for and delete malware on your computer but also protect you in realtime from being infected by it in the first place. So make sure that you get software that has both of these features, as some today do not. Malware can affect your computer in multiple ways. Many times it will cause it to run slower since it is using your computer's memory resources. Viruses are known for deleting data that your computer needs to run efficiently. Once it is deleted, your computer may start to crawl or become totally unusable. Other types of malware, such as spyware, run in the background attempting to collect your personal data. Obviously, this will take a toll on your computer's performance. Worms are often used to slow networks down by clogging up the data being transferred on over the network. So for these reasons, you do not want malware on your system at all.

So now we know the evils of malware. What about all of the other data on your computer? Over the course of a computer's life, programs are installed, photographs and videos are transferred to its hard drive, office documents are written, pictures are drawn. What happens to all of those files? Well, they can start to cause your computer's performance to noticeably drop. Why is that? When files are accessed on a computer, your computer may take the file and change its location on the memory when the file is being run. This allows your file to run faster at the time that it is being used. However, over time, a computer may take different files from one program and spread them all around your computer's hard drive. This actually causes your computer to access these programs slower since it has to look at different areas of memory for all the files needed to run the program. To help with this computer problem, a program was created to put these files back into adjacent positions in the memory so that when the computer is accessing the hard drive to find these files, they are all in one spot. Thus, the computer does not have to look all over, cutting down on the time it takes to start a program. This program is called Disk Defragmenter.

Another way to keep your computer running correctly is to use other utilities that are built to Windows. These programs have changed names as new Windows versions have come out. Some of these tools are ScanDisk and CheckDisk. They are used to check for any disk errors on the hard drive that can ultimately kill it. If they find these errors, they will attempt to fix them. It would be a good habit to run these programs frequently, especially on older hard drives. If they detect many errors, then your hard drive may be close to failing.
As we can see, computer maintenance is essential for the long and healthy life of a computer. By using the information discussed here, our computer should be able to last years and stay quick as well and maybe take some of the frustration out of owning one.

f you would like to learn more about good computer maintenance, please visit Best Computer Maintenance. Also, for information about Windows virus protection and malware protection in general, please visit Windows Virus Protection.net. There you will find tips for keeping your system secure as well as other useful information pertaining to the fight against malware.
Super Motocross

Super Motocross
  
Super Motocross 
Download link Click Hear