Monday, June 27, 2011

Add/Remove optional features of Windows XP

I first mentioned this technique in an old Technology Showcase for Windows 2000, but it still works in Windows XP, and can be quite useful: For some reason, Microsoft has removed the ability to specify which Windows components you want to install during interactive Setup, and when you go into Add/Remove Windows Components in the Control Panel, you still don't have the full list of applications and applets you can add and remove. Thankfully, this is easy to fix.

To dramatically expand the list of applications you can remove from Windows XP after installation, navigate to C:\WINDOWS\inf (substituting the correct drive letter for your version of Windows) and open the sysoc.inf file. Under Windows XP Professional Edition, this file will resemble the following by default:

[Version] Signature = "$Windows NT$"
DriverVer=06/26/2001,5.1.2505.0

[Components]
NtComponents=ntoc.dll,NtOcSetupProc,,4
WBEM=ocgen.dll,OcEntry,wbemoc.inf,hide,7
Display=desk.cpl,DisplayOcSetupProc,,7
Fax=fxsocm.dll,FaxOcmSetupProc,fxsocm.inf,,7
NetOC=netoc.dll,NetOcSetupProc,netoc.inf,,7
iis=iis.dll,OcEntry,iis.inf,,7
com=comsetup.dll,OcEntry,comnt5.inf,hide,7
dtc=msdtcstp.dll,OcEntry,dtcnt5.inf,hide,7
IndexSrv_System = setupqry.dll,IndexSrv,setupqry.inf,,7
TerminalServer=TsOc.dll, HydraOc, TsOc.inf,hide,2
msmq=msmqocm.dll,MsmqOcm,msmqocm.inf,,6
ims=imsinsnt.dll,OcEntry,ims.inf,,7
fp_extensions=fp40ext.dll,FrontPage4Extensions,fp40ext.inf,,7
AutoUpdate=ocgen.dll,OcEntry,au.inf,hide,7
msmsgs=msgrocm.dll,OcEntry,msmsgs.inf,hide,7
msnexplr=ocmsn.dll,OcEntry,msnmsn.inf,,7
smarttgs=ocgen.dll,OcEntry,msnsl.inf,,7
RootAutoUpdate=ocgen.dll,OcEntry,rootau.inf,,7
Games=ocgen.dll,OcEntry,games.inf,,7
AccessUtil=ocgen.dll,OcEntry,accessor.inf,,7
CommApps=ocgen.dll,OcEntry,communic.inf,HIDE,7
MultiM=ocgen.dll,OcEntry,multimed.inf,HIDE,7
AccessOpt=ocgen.dll,OcEntry,optional.inf,HIDE,7
Pinball=ocgen.dll,OcEntry,pinball.inf,HIDE,7
MSWordPad=ocgen.dll,OcEntry,wordpad.inf,HIDE,7
ZoneGames=zoneoc.dll,ZoneSetupProc,igames.inf,,7

[Global]
WindowTitle=%WindowTitle%
WindowTitle.StandAlone="*"

The entries that include the text hide or HIDE will not show up in Add/Remove Windows Components by default. To fix this, do a global search and replace for ,hide and change each instance of this to , (a comma). Then, save the file, relaunch Add/Remove Windows Components, and tweak the installed applications to your heart's content.
Regedit.exe & Regedt32.exe difference

Have you ever noticed that there are two versions of the Registry Editor on your computer? Ever wondered why? Well let me just give you a little insight!

It all depends on your Operating System. If you have Windows 2000 :

Regedit.exe

Regedit.exe is included with Windows NT 4.0 and Windows 2000 primarily for its search capability. You can use Regedit.exe to make changes in the Windows NT 4.0 and Windows 2000 registry, but you cannot use it to view or edit all functions or data types on Windows NT 4.0 and Windows 2000.

The following limitations exist in the Regedit.exe version that is included with Windows NT 4.0 and Windows 2000:

You cannot set the security for registry keys.
You cannot view, edit, or search the value data types <>REG_EXPAND_SZ and <>REG_MULTI_SZ. If you try to view a <>REG_EXPAND_SZ value, Regedit.exe displays it as a binary data type. If you try to edit either of these data types, Regedit.exe saves it as <>REG_SZ, and the data type no longer performs its intended function.
You cannot save or restore keys as hive files.
Microsoft recommends that you use Regedit.exe only for its search capabilities on a Windows NT 4.0-based or Windows 2000-based computer.

Regedt32.exe

Regedt32.exe is the configuration editor for Windows NT 4.0 and Windows 2000. Regedt32.exe is used to modify the Windows NT configuration database, or the Windows NT registry. This editor allows you to view or modify the Windows NT registry.The editor provides views of windows that represent sections of the registry, named hives. Each window displays two sections. On the left side, there are folders that represent registry keys. On the right side,there are the values associated with the selected registry key. Regedt32 is a powerful tool, and you must use it with extreme caution when you change registry values. Missing or incorrect values in the registry can make the Windows installation unusable.

Note: Unlike Regedit.exe, Regedt32.exe does not support importing and exporting registration entries (.reg) files.

Or..Windows XP and Windows Server 2003

Regedit.exe

Regedit.exe is the configuration editor for Windows XP and Windows Server 2003. Regedit.exe is used to modify the Windows NT configuration database, or the Windows NT registry. This editor allows you to view or modify the Windows NT registry. It supports setting security on registry keys, viewing and editing <>REG_EXPAND_SZ and <>REG_MULTI_SZ, and saving and restoring hive files.On the left side, there are folders that represent registry keys. On the right side,there are the values associated with the selected registry key. Regedit is a powerful tool. You must use extreme caution when you use it to change registry values. Missing or incorrect values in the registry can make theWindows installation unusable.

Regedt32.exe

In Windows XP and Windows Server 2003, Regedt32.exe is a small program that just runs Regedit.exe.

Thursday, June 23, 2011

Useful Windows XP DOS Commands & Tricks

XP DOS CommandsTyping DOS commands on the Windows Command Line prompt is a most efficient and faster way of doing things in Windows XP. Here's a run-down of the most useful DOS commands available in Windows XP. Some of these DOS commands even do not have an visual alternative.

DOS Command-line tools must be run at the prompt of the Cmd.exe command interpreter. To open Command Prompt, click Start, click Run, type cmd, and then click OK.

ipconfig - Windows IP configuration
Useful for troubleshooting your internet connection. Displays the current IP address of your computer and the DNS server address. If you call your ISP for reporting a bad internet connection, he will probably ask you to run ipconfig.

fc - Free BeyondCompare in XP
FC is an advanced DOS Command that compares two files and displays the differences between them. Though the file comparison results are not as interactive as BeyondCompare or Altova DiffDog, fc is still very useful. You can even set fc to resynchronize the files after finding a mismatch.

type - open text files sans Notepad
Similar to Unix cat command, Type is my favorite DOS command for displaying the contents of a text files without modifying them. When used in combination with more switch, type splits the contents of lengthy text files into multiple pages. Avoid using the type command with binary files or you'll hear alien PC beeps and see some greek characters on your PC.

ping - Say hello to another computer
Ping network command followed by the web-address or IP address tells you about the health of the connection and whether the other party is responding to your handshake request. Ping tool can also be used to convert the web address to a physical IP address.

tree - visual directory structure
You often need to take prints of your physical directory structure but XP has no simple "visual" commands for printing directory contents. Here, try the Tree DOS command and redirect the output to a text file.

tree > mydirectory.txt
print mydirectory.txt

attrib - make hidden files visible
Attrib lets you change attributes of System files and even hidden files. This is great for troubleshooting Windows XP. Say your XP doesn't boot ever since you edited that startup boot.ini file (Hidden), use attrib to remove the Hidden attibute and edit the file using EDIT dos command.

assoc - which program will open that .xyz file
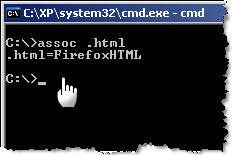
The assoc DOS command can be used to either isplay or even modify the file name extension associations. The command assoc .htm will quickly tell you the name of your default web browser (see picture)

move - more flexible than copy-paste
Say you got a lot of XLS and DOC files in you MyDocuments folder and want to move only those XLS files that have their name ending with 2006. In XP Explorer, you have to manually select each file and then cut-paste to another folder. However, the DOS move command make things much simpler. Just type the following at the command prompt:
move *2006.xls c:\2006Reports\

find - advanced file search with filter
Find is the most powerful DOS command and even more useful than the Windows Desktop Search tool or the Windows Find Wizard. The find command searches for a specific string of text in a file or files. After searching the specified file or files, find displays any lines of text that contain the specified string.

To search your hard disk to find and display the file names on drive C: that contain the string "Google" use the pipe (|) to direct the results of a dir command to find as follows:
dir c:\ /s /b | find "Google"

Quick tip - Drag to avoid typing: When your command acts on a file or folder, you must type the path to that folder after the command. You can save typing time by dragging the file or folder from Windows Explorer into the command window.

To view help at the command-line, at the command prompt, type the following:
CommandName /?

Wednesday, June 22, 2011

Facebook Chat on Skype

how to chat on skypehow to chat on skype
Now Skype has integrated the Facebook Chat inside it which allows you to chat with your friends through the Skype application. Its available as a beta version from the skype website but we can expect full release soon. You can have a glimpse of 'Facebook Chat on Skype' by downloading the Skype 5.5 beta version. Enjoy!.. ‎
-----------------------------------------------------

Tuesday, June 21, 2011

Optimize Windows XP system cache

You may speed up Windows XP if you optimize windows XP system cache settings at LargeSystemCache in Windows registry. According to the Microsoft you can determine whether the system maintains a standard size or a large size file system cache and how often the system writes changed pages to disk. Increasing the size of the file system cache generally improves system performance, but it also reduces the physical memory space available to applications and services. Similarly, writing system data less frequently minimizes use of the disk subsystem, but the changed pages occupy memory that might otherwise be used by applications. System cache mode is designed for use with Windows server products that act as servers. System cache mode is also designed for limited use with Windows XP, when you use Windows XP as a file server. This mode is not designed for everyday desktop use. If you use a server product as a desktop, you should consider changing the resource allocation to Programs mode or adding more physical RAM.

According to the Microsoft when you enable System cache mode on a computer that uses Unified Memory Architecture (UMA) based video hardware or an Accelerated Graphics Port (AGP), you may experience a severe and random decrease in performance. For example, this decrease in performance can include very slow system performance, stop errors, an inability to start the computer, devices or applications that do not load, and system instability.

In Windows registry use this to modify LargeSystemCache values:
HKEY_LOCAL_MACHINE\SYSTEM\CurrentControlSet\Control\Session Manager\Memory Management

Double click at the LargeSystemCache and change the value to 1.

Value 0 = Programs, establishes a standard size file-system cache of approximately 8 MB.
Value 1 = System Cache, establishes a large system cache working set that can expand to physical memory.

Instead of manualy edit the Windows registry use this Windows XP trick to change the system cache settings: Optimize Windows memory usage for faster memory management.

Monday, June 20, 2011

Tired Of Reinstalling Windows

Tired Of 'Reinstalling Windows'
My Suggestions For A Better And Easier Computing !


/* First partition ur HDD as follows. C: (primary, bootable) 10GB, D: (ur choice), E: (10 GB)


/* Next install 2 OSs, it can be XP,XP or XP,9X. One OS in C: and other E:
Let OS in C:\ be called "TRASH" and that in E:\ be called "GOOD"

/* Boot into GOOD OS. Install all the important software (image viewer, winamp, winrar, acrobat, ms-office etc) in E:\program files\. Tweak all you settings, Install all the latest drivers, AV, service packs, patches etc and do the same for TRASH if you want! ALSO INSTALL THE IMAGING SOFTWARE.

/* Now boot to TRASH OS and move the "E:\Documents and Settings" to D:\ and change the default Desktop folder and My Documents folder to d:\doc & settings of TRASH OS. (right click on My Doc, Properties. There just change E: to D:\ or manually "MOVE") for changing desktop u need a tweak program (I use X-Setup, fast and free) NOW INSTALL THE IMAGING SOFTWARE.

/* Depending on ur requirements, allocate pace for D: (say 15 GB). Now OS in E: is the main OS is called GOOD (just for easy identification). and the OS in C:\ is standby and is called TRASH (again this is for easy identification)

DONT FORGET TO ON BOTH THE OS. (I use Paragon HDD Manager, it is fine. The compression is good)

/* Boot into GOOD OS. and change the default Desktop folder and My Documents folder to d:\documents and settings.

/* Boot into TRASH OS. Defragment E:. Now load the imaging program, take the image or save image to file (NOT DRIVE COPY) and store safely (if it is on secondary hdd it is good) or if dont have one, save it to different partition or save on CD.

For installing image viewer, winamp, winrar, acrobat, ms-office and other must have apps use the Program Files folder (E:\)


Now you are done!

Since documents and settings is in D:\, if u restore from image, your private files are NOT lost.
The OS in C: is TRASH and the OS in E: is GOOD. These are just labels for better identification.


Use E:\ OS or GOOD as your primary OS. After this install any software utls to D:\. Sort software in categories like video, audio, dvd, cd, internet, graphics, protection etc. and install each app in thier sub-folder under the category.

If anything goes bad, goto standby OS, load Imaging app, restore the E-drive.

Sunday, June 19, 2011

Mastering The Windows XP Registry

The Recovery Console:
The Windows XP Recovery Console is a tool that allows recovery from a number of failures. Previously, all you could do was boot another copy of Windows XP and hack your way around, replacing files, even registry components, in the blind hope that you would somehow  fix the problem.
With Windows XP, you have two tools to use: the Recovery Console and the Safe Mode feature.
The Recovery Console is a powerful, simple (no, that's not an oxymoron!) feature that is supplied with Windows XP, but it is not installed by default. The Windows XP Safe Mode works in the same manner as the Safe Mode found in other versions of Windows. You can modify a number of system settings using Safe Mode (such as video modes). Installing the Recovery Console after the system has failed is quite like locking the barn door
after the horse has been stolen—it really won't work that well.

Installing the Recovery Console:
The Recovery Console must be installed before disaster strikes. It will be difficult (maybe even impossible) to install it after a disaster has reared its ugly head. So, let's install the Recovery Console right now.

First, you must use the Windows XP distribution CD (or share containing the appropriate files, if installing from a network device). The Recovery Console is installed using the winnt32.exe program. The winnt32.exe program is the same program that is used to install Windows XP; however, by selecting the correct option, you are able to tell winnt32.exe to not install Windows XP, but to install the Recovery Console instead.

Note It is not possible to install the Recovery Console at the same time as Windows XP. You must first install Windows XP, then install the Recovery Console. If you have multiple copies of Windows XP installed, it is only necessary to install the Recovery Console one time—the Recovery Console will work with as many copies of Windows XP as are
installed.

Follow these steps to install the Recovery Console from the Windows XP distribution CD:
1. Insert the distribution CD and change into the i386 directory.
2. Run winnt32.exe using the /cmdcons option. Typically, no other options are needed, though some users may wish to specify source options, especially if installing from a network share rather than a hard drive.
3. The installation program contacts Microsoft to check for updates to this Windows XP component.

Figure 2.3: Windows XP's Dynamic Update uses the Internet to retrieve the latest files directly from Microsoft.
4. The winnt32.exe program opens the dialog box shown in Figure 2.4. This dialog box allows you to cancel the installation if you need to. Note that multiple installations of the Recovery Console will simply overwrite previous installations; in such cases, no error is generated.

Figure 2.4: Setting up the Recovery Console using winnt32/cmdcons by passes all other setup options.
5. If there are no errors, the dialog box shown in Figure 2.5 is displayed. The Recovery Console is ready for use at this point.

Figure 2.5: The Recovery console has been successfully installed.

What's in the Recovery Console?

The Recovery Console consists of a minor modification to the boot.ini file, and the addition of a hidden directory on the boot drive. The added directory's name is cmdcons. The change to the boot.ini file is simply the addition of another line providing for a new boot option:
C:\cmdcons\bootsect.dat="Microsoft Windows Recovery console" /cmdcons
This option consists of a fully qualified file name (C:\cmdcons\bootsect.dat), a text description (Microsoft Windows Recovery Console), and a boot option (/cmdcons).
As everyone should be well aware, the Windows XP Boot Manager is able to boot virtually any operating system (assuming that the operating system is compatible with the currently installed file system).

How Windows XP Supports Booting other Operating Systems
Windows XP can be told to "boot" any directory or file location. For example, the Recovery Console is saved in the cmdcons directory. In the cmdcons directory is a 512-byte file named bootsect.dat. Windows XP will treat a file named bootsect.dat exactly as if it were a hard disk's boot sector. In fact, one could, theoretically, copy the bootsect.dat file to a drive's boot sector location and cause that operating system to be booted directly.

One use for this technology is in a multiple-boot configuration where the other operating system or systems are not compatible with Windows NT (such as Windows 95/98/Me).
The Recovery Console does qualify as an operating system, though it is very simple—and limited.
A major question will always be this: is the Recovery Console secure? In most situations, the
Recovery Console is actually quite secure. The user, at startup of the Recovery Console, is prompted for two pieces of information:
• Which Windows XP installation is to be repaired (assuming that there is more than one Windows XP installation!).
• The Administrator's password for that installation. The Recovery Console then uses the installation's SAM to validate this password to ensure the user has the necessary permission to use the system.
A situation comes to mind: if the Administrator's password is lost or otherwise compromised, not only may it be impossible to use the Recovery Console, but anyone with access to the compromised password could modify the system with the Recovery Console. This is not really an issue, though. If the Administrator's password is lost, that's life. It will be difficult, if not impossible, to recover the password. If the security of the Administrator's password is compromised, then it will be necessary to repair the damage—changing the password is mandatory in this case. In either case, the Recovery Console is no less secure than Windows XP is.
The cmdcons directory holds over 100 files.***===***

How to delete all RSS feeds on windows7

You Are added hundreds of RSS feeds to IE 8.0 on Windows7. But Now You need to delete all RSS feeds in IE at once. There is a simple way to do.

Go to-----------

C:\Users\$user-name$\AppData\Local\Microsoft\Feeds

$user-name$ is your Account name in the computer. Now you just delete all contents.
Thats It You Are Deleted Alls.....................

Best wireless router windows 7 compatible

Are you want to buy a wireless router to replace your wired router? You'd better know what is the best wireless router available at this time.

There are the below wireless router compatibled with Windows 7 32bit/64bit:
All products installs automatically without any extra driver.

Cisco Linksys WRT310N Wireless-N Gigabit Router Wireless Router
Netgear Rangemax Dual Band 802.11n WNDR3300 Wireless Router
Linksys Broadband 802.11n 4Port Wireless Router
Linksys Dual-Band Gigabit 802.11n Wireless Router

Belkin Wireless Router:
G F5D723-4
N+ F5D8235-4
N F5D8236-4
N F5D8233-4
802.11g DSL/Cable Gateway F5D7230au4
F5D7230uk4 G F5D7230uk4
F6D4230-4 N150 Enhanced F6D4230-4
N150 F6D4230uk4
G F5D7230-4

D-Link Wireless Router:
DIR-628 RangeBooster N Dual Band
DIR-635 RangeBooster N 650
D-Link DIR-855 Xtreme N Duo Media
D-Link DIR-825 Xtreme N Dual Band Gigabit
D-Link DGL-4500 Xtreme N Gaming
D-Link DIR-615 N
D-Link DIR-655 Xtreme N Gigabit
D-Link DIR-300 Wireless-G
D-Link DIR-320 Wireless-G USB Print Server
D-Link DIR-600 150

Netgear Wireless Router:
Rangemax Dual Band 802.11n WNDR3300
WNR3500.........
***===***

Nature wallpapers


Saturday, June 18, 2011

Disable searchindexer.exe in Windows 7

SearchIndexer.exe (Microsofts Windows Search Indexer) in Windows 7 is the powerful windows search, but sometimes it uses a amount of CPU Usage and may utilizes near 100% CPU usage. Looking at the Resource Monitor the process 'Searchindexer.exe' is getting High CPU. So you need to disable or Delete SearchIndexer.exe to stop Windows Enhanced Search.

How to disable searchindexer.exe in windows 7

* Click Start Button --> Control Panel --> Programs and Features --> Turn Windows Features on or off.
* Clear the Indexing Service's chek box on the "Windows Features" window and click ok.

Now you turn off Windows Search's Index service and Windows 7 still has its simple search functionality.

Increase Internet Download Connections

Increase Internet Download ConnectionsThis trick increase Simultaneous Internet Download Connections
and increases the number of allowed simultaneous connections to a higher number. The
default value is only five connections.
Navigate to the following registry key:
HKEY_CURRENT_USER\Software\Microsoft\Windows\CurrentVersion\Internet Settings.
Right click on the window pane and create a DWord key with the name
“MaxConnectionsPer1_0Server” as it is without quotes. Set the value to a higher number
like 0000000a. Note that they are zeros and not alphabet ‘O’.
Right click on the window pane and create another DWord key with the name
“MaxConnectionsPerServer”. No quotes please. Set the value to a higher number like
0000000a. Note that they are zeros and not alphabet ‘O’.
***===***

How To Increase System Performance

How To Increase Your System Performance
If you have 512 megs or more of memory,
u can Increase system performance
And Make Computer Faster !
by having the core system kept in memory

Follow This steps.
Startmenu   Run  Type Regedit
Go to HKEY_LOCAL_MACHINE\SYSTEM\CurrentControlSet\Control\ Session Manager\ Memory Management\ DisablePagingExecutive
Set the value to be 1
And Finaly Reboot Your computer
Now Check Your System Performance.......

Thursday, June 16, 2011

Protect your computer from hackers

Learn how to prevent yourself from being a victim and a distributor of computer email viruses and worms. Take these simple precautions...And Protect Your Computer !

   1. NEVER open an attachment in an email UNLESS you are sure you understand what it is and why it’s been sent to you. When in doubt, delete. You can always write back to the person who sent it and ask if they intended to send an attachment and to please explain what it was and then resend it. Most viruses are triggered by unwitting victims opening an attachment.
        
   2. INSTALL PROTECTION SOFTWARE — NOW! Once you have it, you will help stop the spread of viruses. If you don’t have it, you will sooner or later regret leaving yourself so vulnerable. It is absolutely worth the money spent for it! (See the list of anti-virus software on the right.)
        
   3. BLOCK PORN and other spam, as well as viruses, with a program called MailWasher Pro. For a very low price, MailWasher will look inside your mailbox before you run your email program, identify the porn and spam and viruses, and delete it for you. It will even help you fight back by sending a bounce message that tells the spammer that your address is invalid (so that it’s removed from their mailing list). Then you can safely open your email.
       
   4. Find out what’s NOT a virus and don’t clog up the internet spreading false alarms. When you get word of a virus, take a minute to check it out first, before forwarding the message to others and embarrassing yourself. Here’s a great site for this research:
      urbanlegends.miningco.com/library/blhoax.htm
        
   5. BEWARE OF SPIES, HACKERS & KEY LOGGERS!
      There are programs that can spy into your computer. It happens when people download a program (such as a game) that comes bundled with “Sputnik” or “VX2″ or another brand of spyware. It installs itself silently on your computer and then monitors your “clickstream” as you navigate around the web, sending information about your activities (including credit card numbers!), back to the originator. Disclaimers claim that credit card info will not be used (sooo — why get it then?)

      To make matters worse, there seems to be a connection between this and an increase of popup ads while surfing the Internet!

   6. Always be careful about what you download. Is it from a trustworthy software manufacturer? But since “trust” is only a guess, the best advice is to extend your anti-virus protection to include anti-spyware (to block your personal information from being taken without your permission), anti-hacker-tools (to prevent hijackers from accessing your PC), anti-key-loggers (to safeguard your passwords and other private stuff) and anti-worms (to hack away at hacker tools that can exploit your computer even after they’re gone).
***===***

Make Folder or File Without A Name


Do you know how to make a folder without a name? is it possible? Yes it is possible you can make a folder or a file without any name.Try Its,

1). Click the folder or file which you want to have no name.

2). Right click on it and then click rename and delete the old name.

3). Press ALT button from your keyboard and type 0160(holding alt) after that press enter. Note that while you will type 0160 it will not appear, but continue typing and press enter.. thats it. Its Done.

Make sure that you are using the number pad, using just the row of numbers above the qwerty doesn’t work. For a laptop, if you dnt have number pad then check and see if there’s a pseudo-numpad that uses the fn key. then you can just hold down the fn and alt at the same time while typing in 0160.

For deleting this folder you have to rename it by using command prompt. remember dont use space use alt+0160 as current file name
***===***

Increase/decrease size of Recycle Bin

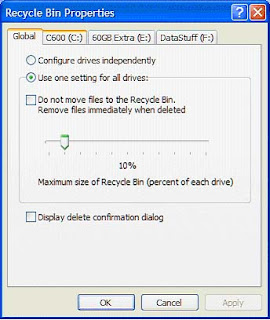
Increase/decrease size of Recycle BinYou can increase and decrease the size of the Recycle Bin. There are some size limitations with Recycle Bin size, its default size is equivalent to 10 percent of the drive size. But if you delete a larger size file accidentally, you can retrieve this file from Recycle Bin that is why you should set the maximum storage size of the Recycle Bin.

  1. First Right click on the Recycle Bin icon on the Desktop of your computer then go to Properties.
  2. Adjust the slider bar in the center of the screen from 10% to maximum size as you want.
  3. Then click OK button to save your new sitting and exit the Recycle Bin Properties Window.
  4. After change reboot your computer to have Windows fully initiate the necessary changes to your system.

Harry Potter and the Goblet of Fire

 ENGLISH NOVELS , Harry Potter , J.K. Rowling 


Harry Potter and the Chamber of Secrets by J.K. Rowling

Harry Potter and the Chamber of Secrets by J.K. Rowling
 ENGLISH NOVELS , Harry Potter , J.K. Rowling


Harry Potter and the Sorcerer 's Stone

Harry Potter and the Sorcerer 's Stone
ENGLISH NOVELS , Harry Potter , J.K. Rowling 

Harry Potter and the Half-Blood Prince

Harry Potter and the Half-Blood Prince
 English Novels* Harry Potter , J.K. Rowling *

bhule shah poetry

Bhule Shah Poetry 
                                Bhule Shah's Most Readable Poetry Book                              
bhule shah poetry

Bachpan Ka December

Bachpan Ka December
Urdu Novel By Hashim Nadeem
Bachpan Ka December


Blogger Template Design Tutorials

Blogger Template Design TutorialsThis tutorial is a very quick guide to teach you how to change or design your own Blogger templates. It’s easy to understand and follow, especially to those who has no knowledge in HTML programming.
The tutorial is split into a number of sub-tutorial modules that explain specific parts of Blogger template design in detail. The best way to learn is by going through the module sequence one by one. But if you are familiar with the basics, you can jump into the more advanced modules. The earlier modules are focused on explaining the basic structure of the template design and the template code so that you understand more about a Blogger template in general. The later modules explain each section of a Blogger template in more detail and help you go through the process of coding and designing a template in a step-by-step approach***===***      

Download link                
Click here  

Wednesday, June 15, 2011

Control Your Mouse Pointer With Keyboard

Control Mouse Pointer With KeyboardYou can control your Computer mouse pointer with keyboard keys in all windows versions. When your mouse stops working, you can enable this keyboard feature to complete your important work. This keyboard mouse can performs all tasks same like a normal mouse.
Follow the given steps to activate the keyboard mouse:

To edit this feature, first you should log onto your computer with administrative rights.

To activate this feature, press Alt+Shift+NumLock keys at once and you will receive a small MouseKey box.

To keep MouseKeys on, click on Ok button or click on cancel button to cancel MouseKeys box.

Click on Settings button, if you want to adjust the mouse cursor detail settings.

Here a new dialog box will appear with the title “Settings for MouseKeys”, now you can manage all mouse settings for example mouse cursor speed, acceleration and some other features.

Now using Numeric keypad, you can move your mouse pointer. The controls are:

1,2,3,4,6,7,8 and 9 keys are used to move the mouse cursor into different directions.

Key 5 is used as mouse click button.

Insert key used to hold down mouse button.

+ Sign used to double click on any object.

Delete button used to release the mouse.

Click on NumLock button to disable this keyboard mouse feature.

Speed Up Ur Ram

Speed Up Ur Ram
Memory 'Speed up' U may recognize that ur system gets slower and slower when playing and working a lot with ur pc. That’s cause ur RAM is full of remaining progress pieces u do not need any more.
So create a new text file on ur desktop and call it .. uhm.. “RAMcleaner” or something..


Type:---- FreeMem=Space(64000000)in this file and save it as RAMcleaner.vbs [ You may choose the "All Files" option when u save it ]
Run the file and ur RAM may be cleaned :>Of course u can edit the code in the file for a greater “cleaning-progress”.
FreeMem=Space(1280000000)
(just try it And! make computer faster)
***===***

How to change Name your Processor

 Change 'name of Processor'
Go To Start  Run Type Regedit
HKEY_LOCAL_MACHINE
HARDWARE
DISCRIPTION
SYSTEM
CENTRAL PROCESSOR

On Right Hand Side Right Click On Processornamestring And Then Write Anything
 You Want In That Textbox
***===***

How To Hide Ur Drives

Hide Ur Drives
How to Hide 'a Hard Drive'(c:,d:,e:,f:…etc)
This is a great trick you can play on your friends. To disable the display of local or networked drives when you click My Computer

1.Go to start->run.Type regedit.Now go to:

HKEY_CURRENT_USER\Software\Microsoft\Windows\CurrentVersion\Policies\Explorer

Now in the right pane create a new DWORD item and name it NoDrives(it is case sensitive). Now modify it’s value and set it to 3FFFFFF (Hexadecimal) .Now restart your computer. So, now when you click on My Computer, no drives will be shown(all gone…). To enable display of drives in My Computer, simply delete this DWORD item that you created.Again restart your computer.You can now see all the drives again.
***===***

Disable Error Reporting in Windows

windows error reporting Disable In xp

1. Open Control Panel
2. Click on Performance and Maintenance.
3. Click on System.
4. Then click on the Advanced tab
5. Click on the error-reporting button on the bottom of the windows.
6. Select Disable error reporting.
7. Click OK
8. Click
***===***

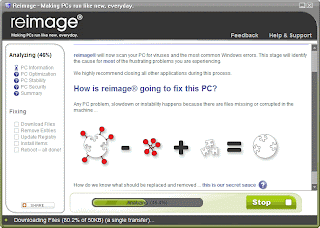
Repair your Windows Operating System Online with Reimage

Most Windows XP users will notice their system seems to get slower and slower compared to when they first installed the operating system. As the time passes, we installed a lot of programs and stored a lot of files, causing the operating system used more system resources and makes your computer slower. Besides that, with the emergence of internet and file sharing, users can unknowingly install what is known as spyware or malware. These malwares, spywares and viruses damaging your operating system and degrading its health.

Repair  Windows Operating System  with Reimage
What is Reimage?
Reimage is a web-based service runs via ActiveX that repairs damaged Windows XP systems so that your operating system will run like it first installed. Reimage repairs Windows XP PCs remotely over the network or internet and specialized in Windows XP PCs that won’t reboot.
Reimage performs its works by applying a set of predefined actions according to the problem in the XP systems. By referencing with over 4 million registry and components repository, Reimage looking for components or objects that are missing, new objects or changed by viruses, malware or other malicious software. Then, Reimage will replace the missing objects with the repository databases and restore the services or components to its original state. For the new components or objects, Reimage will disable them so they can’t do harm anymore. Unlike built-in Windows XP system restore, Reimage doesn’t affect user data or applications on the operating system.

Here are some features of Reimage:
  1. Reduce repair time – Save time because Reimage is easy to use and there is no need to call your technician each time you have PC problems.
  2. Optimize your Windows XP machine – Reimage will provide diagnosis for your PC, including processor usage, memory usage, hard disk usage, Windows Paging usage. Then provide you with a set of recommendation for your PC.
  3. Repairs all kind of problems on your Windows XP PC – This is including registry fixes, driver fixes, check for security issues, and disable all kind of malicious programs on your PC.
  4. No installation required – Because Reimage used web-based ActiveX, you can run it anywhere as long as Internet Explorer is installed.
For Reimage Home Edition, it also comes with a Free PC booster which capable to speed up most common programs on your PC. Unfortunately, Reimage only available for Windows XP.
You can check out more about Reimage at Reimage blog or you can view the company video: How the technology works.

Change Name Of Windows Recycle Bin

Change Name Of Recycle Bin
How To change name of ' Windows Recycle Bin' desktop icon,
follow these steps:
Go To          Run        Type       regedit
and then go to:
HKEY_CLASSES_ROOT/CLSID/{645FF040-5081-101B-9F08-00AA002F954E}
and change the name “Recycle Bin” to whatever you want (don’t type any quotes)
***===***

Monday, June 13, 2011

Memory Trick To Speedup Windows Xp

Here is one of the not so known method for(speed memory) free-up the RAM to make the speed up windows.

When programs run in Windows XP, they frequently use what are called DLLs (Dynamic-Link Libraries).
These contain shared programming instructions and other files like icons, graphics, sounds, etc. that different applications use in order to run. DLLs are stored in RAM whenever the applications load them; when you quit a program, XP is supposed to release the DLL from memory. But some DLLs can get stuck.

(Here is the method to mend this up.)
Step 1: You can force Windows XP to release DLLs by adding a Registry key.

Step 2: Select Start > Run >Enter regedit >Hit Ok

Step 3: This will open the Registry Editor and navigate to

My Computer -> HKEY_LOCAL_MACHINE -> SOFTWARE -> Microsoft -> Windows -> CurrentVersion -> Explorer.

Step 4: Right click on EXPLORER in the Left Pane, Select New > Key.

Step 5: Name it as AlwaysUnloadDLL and set the default value to 1.

Step 6: Restart Windows to activate the change.
***===***

Saturday, June 11, 2011

Are you looking for a portable freeware desktop calculator

portable freeware desktop calculator
Are you looking for a portable freeware calculator on desktop? Then try out Speedcrunch.With Speedcrunch you can perform all complex mathematical calculations.It’s a fast, high precision and powerful desktop calculator.It’s an extremely fast and lightweight calculator that supports extended expressions.This Portable calculator is available for Linux, Windows, and Mac Os X.
Key Features of “Speedcrunch”:
1.At your fingertip: Just type the expression that you want to calculate and press Enter. You can see clearly what you typed along with the result in the scrollable display.
2. Unlimited variables:Advanced calculation sometimes needs memory feature. SpeedCrunch allows variables to hold calculation result.
3. Syntax highlighting: You can easily distinguish numbers from variables by giving colors to expression according to the syntax.
4. Functions, with automatic completion: Get auto-completion expressions as you type a letter.
5. Smart correction: SpeedCrunch can understand an incomplete expression.
6. Keyboard-friendly: It has got keyboard shortcuts to speed up your task.

DOWNLOAD:  SPEEDCRUNCH
                                        

Friday, June 10, 2011

search for hidden or system files in Windows XP

Search for hidden or system files in Windows XP! differently than in earlier versions of Windows. 
Search for Hidden or System Files By default, the Search companion does not search for hidden or system files. Because of this, you may be unable to find files, even though they exist on the drive.
To search for hidden or system files in Windows XP:
Click Start, click Search, click All files and folders, and then click More advanced options.
Click to select the "Search system folders and Search hidden files" and folders check boxes.

hidden or system files in Windows XPNOTE: You do not need to configure your computer to show hidden files in the Folder Options dialog box in Windows Explorer to find files with either the hidden or system attributes, but you need to configure your computer not to hide protected operating system files to find files with both the hidden and system attributes. Search Companion shares the Hide protected operating system files option (which hides files with both the system and hidden attributes) with the Folder Options dialog box Windows Explorer.

Thursday, June 9, 2011

Reset Win XP Admin Pass with ONLY DOS

How To Reset Password For Win XP Admin with Only Dos
1. Click on start, enter "cmd" and press enter

2. Enter "net user" or "net users"

You will see the list of users that are created on current running os

3. Type "net user" "user name" "*"

You will see that windows will now ask you to enter new (password) for that particular account!

Magic! no any type of super user privileges needed!

See the commands below:
If the administrator account user name is "admn" then command to change it's password will be  Reset WinXP Admin Pass with ONLY DOS

Wednesday, June 8, 2011

Use right click extender to customize your Windows context menu

Use right click extenderRight-Click Extender is a tiny free app which allows the Windows 7 users to add many useful utilities to it’s right click menu.
With it’s intuitive user interface it is really simple to understand and use this software. Just check the desired boxes and click on “Apply” button to add the selected utilities to right click menu of the Windows 7  OS.
The software is mainly developed for Windows 7 operating system but should work withWindows Vista as well. You can download this freeware from the link given below.
windows 7 start menu customize 

Sunday, June 5, 2011

Change Windows xp Home to Professional Edition

(Please try this at your own risk)
To Change.
 windows xp home edition To Professional Edition
Follow these steps:
1. Copy the root directory and the i386 directory of the WindowsXP CD to your hard drive.

2. Extract the Bootsector of your Windows XP CD. You can use BBIE to do this.

3. Click START–>RUN–>REGEDIT

4. Highlight HKEY_LOCAL_MACHINE

5. Click FILE–>LOAD HIVE and select the Setupreg.hiv file
This file is located in the i386 folder. Use the one you extracted to your hard drive from your Windows XP CD.

6. Locate the following registry key:

HKEY_LOCAL_MACHINE\Homekey\ControlSet001\Services\setupdd

7. Edit the DEFAULT key and change the following values:

01 to 00
02 to 00

8. Change the name to the value HOMEKEY to anything.

9. Locate the following registry key:

HKEY_LOCAL_MACHINE\Homekey\ControlSet001\Services\setupdd

Edit the DEFAULT key and change the following values:

01 to 00
02 to 00
10. Highlight HOMEKEY and select FILE–>UNLOAD HIVE

Saturday, June 4, 2011

23 hidden windows apps in window xp

To run any of these apps For Windows  go to Start > Run and type the executable name:

1) Character Map = charmap.exe (very useful for finding unusual characters)

2) Disk Cleanup = cleanmgr.exe

3) Clipboard Viewer = clipbrd.exe (views contents of Windows clipboard)

4) Dr Watson = drwtsn32.exe (Troubleshooting tool)

5) DirectX diagnosis = dxdiag.exe (Diagnose & test DirectX, video & sound cards)

6) Private character editor = eudcedit.exe (allows creation or modification of characters)

7) IExpress Wizard = iexpress.exe (Create self-extracting / self-installing package)

8 Mcft Synchronization Manager = mobsync.exe (appears to allow synchronization of files on the network for when working offline. Apparently undocumented).

9) Windows Media Player 5.1 = mplay32.exe (Retro version of Media Player, very basic).

10) ODBC Data Source Administrator = odbcad32.exe (something to do with databases)

11) Object Packager = packager.exe (to do with packaging objects for insertion in files, appears to have comprehensive help files).

12) System Monitor = perfmon.exe (very useful, highly configurable tool, tells you everything you ever wanted to know about any aspect of PC performance, for uber-geeks only )

13) Program Manager = progman.exe (Legacy Windows 3.x desktop shell).

14) Remote Access phone book = rasphone.exe (documentation is virtually non-existant).

15) Registry Editor = regedt32.exe [also regedit.exe] (for hacking the Windows Registry).

16) Network shared folder wizard = shrpubw.exe (creates shared folders on network).

17) File siganture verification tool = sigverif.exe

18 Volume Contro = sndvol32.exe (I've included this for those people that lose it from the System Notification area).

19) System Configuration Editor = sysedit.exe (modify System.ini & Win.ini just like in Win98! ).

20) Syskey = syskey.exe (Secures XP Account database - use with care, it's virtually undocumented but it appears to encrypt all passwords, I'm not sure of the full implications).

21) Mcft Telnet Client = telnet.exe

22) Driver Verifier Manager = verifier.exe (seems to be a utility for monitoring the actions of drivers, might be useful for people having driver problems. Undocumented).

23) Windows for Workgroups Chat = winchat.exe (appears to be an old NT utility to allow chat sessions over a LAN, help files available).

Note:- Some of them might not run in Windows XP Home edition

Tere Jane Kay Baad

Tere Jane Kay Baad Koi Bhi To Nahien Aaya
Urdu Poetry In Urdu
Tere Jane Kay Baad (Urdu Poetry)

Friday, June 3, 2011

Mere Sathi

Mere Sathi Meri Ye Rooh
Urdu Poetry In Urdu 
Mere Sathi (Urdu Poetry)
 Sathi  Mere (Urdu Poetry)

Thursday, June 2, 2011

Reduce Spam Emails

All of us use emails for communication and thus each one of us must have come across some spam mails every day. No one like Spam Messages and thus in this....
Here are 10 top tips to reduce spam in your email in-box.
  1. Delete/turn off your catch-all

    Catch-all’s are generic mail boxes that collect all email not being sent to a named account. The up-side of catch-alls is that if someone spells an email address correctly then you still have a chance to access the message. The down side is that automated mailers send emails to randomuser@yourdomain.com. So by removing your catch-all email account you will stop a majority of junk messages.
  2. Make sure that you dont publish personal email addresses on your website.

    Automated systems ‘trawl’ websites looking for email addresses, adding them to lists without your permission. If you do want to publish a personal email address disguise it using javascript or as an image (these will be inaccessible and stop some disabled viewers from emailing you), or even better, replace the email address with a contact form allowing you to pre-qualify enquiries by asking detailed questions or giving a choice of specific variables.
  3. Set up a generic email address for use on forums, registration pages and other situations where you know that you may be opening yourself up to receiving spam email.

    We use sam@ (that’s spam@ without the p) and all emails from such sites are collected centrally where they can be reviewed and acted upon e.g. To validate your registration etc.
  4. Don’t use single names i.e. fred@ for your email address.

    Again, these addresses can be guessed and within a few minutes a flood of spam begins to arrive. Instead opt for firstname.surname@. An added benefit is that it makes sure your contacts really know who you are.
  5. Don’t use sales@ support@ or any other guessable addresses for the same reason as above.

    Instead come up with your own codes for online contact forms etc. As they’re being accessed through a form and don’t need to be entered manually – you can really go wild with these.
  6. Register a dedicated email domain.

    It may be a bit extreme, but if spam becomes so unmanageable, it may be worthwhile registering a completely different address to email from. This could be name@emailcompanyname.com.
  7. Use an email program with integrated spam filtering.

    Outlook (not express) has limited in-built spam filtering. A better option would be to use Mozilla’s free email program Thunderbird, which automatically tags possible spam for you. A great feature of Thunderbird is you can set the default view to show all messages marked as not-spam, which dramatically reduces the amount of clutter and enables you to toggle between spammy and non spammy views.
  8. Ask your host what spam filtering packages they offer.

    With our Fasthosts accounts, the email server can* automatically catch and label potential spam as spam. It doesn’t stop the messages from being delivered, but by setting up message rules, you can easily drop these out of the main view, into a folder, for later review.
    * Extra charges apply.
  9. Subscribe to a mailing preference service.

    There are a number of mailing preference services out there that operate as closed email networks. In order to send a message to a member of these systems, you have to register on the website and provide proof that you are who you say you are. As someone who wants to send a simple message, this can be pretty hard going, with lots of forms to fill in; but as a recipient, you know that all messages being delivered are from authentic sources.
  10. Don’t send bulk emails using TO or CC.

    If you’re sending the latest Friday Funny, or a quick promotional offer to friends and/or colleagues, don’t use TO or CC. These types of email have tendancy to be passed on to persons unknown, the result is that everyone you’ve listed as an original recipient could be easily added to a list by an unscrupulous individual. What makes this worse is that not only are the original recipients easily visible, but also the subsequent chain(s) of people.

Scan Links for Malware Infection with VTChromizer before Clicking

Scan Links for Malware Infection
Before clicking the link and starting the download, wouldn’t it be great if you can get to know the origin of the link or how trustworthy it is? VirusTotal which is one of the good scanners available has released an extension called as VTChromizer for the Chrome browser to scan the link before you hit download.
Just use the right click context menu in the Chrome browser after installing this extension, and select the option of “Scan with VirusTotal” to get the link analyzed with the database available with VirusTotal.
Thus if you are not sure of the genuineness of the content before downloading then it is always better to get the link scanned before downloading.
Download VTChromizer