Wednesday, July 27, 2011

Change TCP/IP settings on Vista

(Change TCP/IP settings in Vista !)
TCP/IP defines the language that your computer uses to communicate with other computers. We recommend using automated Dynamic Host Configuration Protocol (DHCP) to automatically assign Internet Protocol (IP) addresses to the computers on your network, if your network supports it. If you use DHCP, then you don't have to change your settings if you move your computer to another location, and DHCP doesn't require you to manually configure settings such as Domain Name System (DNS) and Windows Internet Name Service (WINS).
  
1.Open Network Connections by clicking the Start button Picture of the Start button, clicking Control Panel, clicking Network and Internet, clicking Network and Sharing Center, and then clicking Manage network connections.


2.Right-click the connection that you want to change, and then click Properties. Administrator permission required If you are prompted for an administrator password or confirmation, type the password or provide confirmation.


3.Click the Networking tab. Under This connection uses the following items, click either Internet Protocol Version 4 (TCP/IPv4) or Internet Protocol Version 6 (TCP/IPv6), and then click Properties.

4.To specify IPv4 IP address settings, do one of the following:

To obtain IP settings automatically, click Obtain an IP address automatically, and then click OK.

To specify an IP address, click Use the following IP address, and then, in the IP address, Subnet mask, and Default gateway boxes, type the IP address settings.

5.To specify IPv6 IP address settings, do one of the following:
 
To obtain IP settings automatically, click Obtain an IPv6 address automatically, and then click OK.  

To specify an IP address, click Use the following IPv6 address, and then, in the IPv6 address, Subnet prefix length, and Default gateway boxes, type the IP address settings.


6.To specify DNS server address settings, do one of the following:   

To obtain a DNS server address automatically, click Obtain DNS server address automatically, and then click OK.  

To specify a DNS server address, click Use the following DNS server addresses, and then, in the Preferred DNS server and Alternate DNS server boxes, type the addresses of the primary and secondary DNS servers.

7. To change DNS, WINS, and IP settings, click Advanced.
Computer Tips n Tricks

How to Disable UAC using registry editor

If you would like to 'Disable The UAC( User Access Control) feature in Windows Server 2008 or Windows Vista, you can go to Control Panel > User Accounts. Beside going to control panel, you can also turn it off/on using registry editor, you can find the UAC key in HKLM\SOFTWARE\Microsoft\Windows\CurrentVersion\Policies\System

EnableLUA (DWORD)= change the value to 1 (On) or 0 (Off)

By the way, try not to disable UAC feature, as this will reduce the security enhancement to protect your workstation and servers in the future

Monday, July 25, 2011

Make The All Programs Menu Scroll

We are all addicts for free software and, in many cases, can't resist installing the latest applications on our pc's. This inevitably bloats the All programs menu so that you are in a situation as when you open All programs two, three or maybe four columns roll out to the right of the screen filled with applications. This is fine if you have a monitor with an already high resolution display. But what happens if you have visual problems and you rely upon the standard 800 x 600 screen resolution? The simple answer is that the list of applications disappears from view and you are unable to see what is on the All Program list because it is covered by the taskbar or has disappeared off screen. So what is the answer? Simple enable the All programs list to scroll instead of slide.

1" Right click on a vacant spot on the taskbar

2"From the drop down menu select properties

3" In the properties window click on the Start Menu tab

4" In the Start menu tab click the Customise button

5" When the Customise window appears click the Advanced tab

6" Scroll down the list of items in the Start Menu Items list

7" Towards the bottom and right underneath the Run Command you will see an option called Scroll programs

8" Place a Tick in the box to the left of this option

9" Next press OK

10"In the next windows press the Apply button followed by OK to close the properties window

11" Now click the Start button followed by All programs

12" Your applications should now appear in one long list with a scroll button at the bottom of the list.
Computer Tips n Tricks

Saturday, July 23, 2011

Ctrl+Alt+Del Change combination function in windows 7

Change Ctrl+Alt+Del combination function in windows 7
Ctrl+Alt+Del have been one of the rescue Key combos since the Windows Evaluation. And during succession of Windows it has changed the offers and functionality it provides to user.
In Windows 7 Ctrl+Alt+Del combo gives the following option
· Change Password
· Lock Computer
· Task Manager
· Logoff
· Start task Manager

However restrictions can be made on the above features using Group Policy Editor Setting. This setting may
· Prevent users from locking the system
· Prevent users from changing their Windows password on the Windows Security dialog box (which appears when you press Ctrl+Alt+Del).
· Prevent users from starting Task Manager
· This setting disables or removes all menu items and buttons that log the user off the system.
Ctrl+Alt+Del Change combination function in windows 7
 Steps to disable any of the features:
· Open Run Dialogue Box (Win + R) and type gpedit.msc
· Navigate to Local Computer policy > User Configuration > Administrative Templates > System in left hand side pane.
· Select Ctrl+Alt+Del Options setting
· Select any of the setting you want to enable from right side pane. (Enabling a setting means disabling the feature)
· Open it and enable it.
· Press OK
(A Reboot is required for the above setting to take place)

Movie playing in MS Paint

'playing Movie' in MS Paint
1) Open your favorite movie player and play the "movie"(I played the .mpeg format in Windows Media Player)

2) Hit "PrintScreen", keep playing the movie in the player,dont stop it.

3) Open MsPaint.

4) Select "Edit>Paste" Or Hit "CTRL+V"

5) Presto! You can watch movie in Paint!

6) But there are no Pause, Next, Previous, Stop etc. buttons

Tuesday, July 19, 2011

Change start menu size in Windows7

How to Change the Height of the Windows 7 Start Menu?
If you are not sure where can go to the settings to resize the start menu,
there is a quick and simple way to change the Start Menu size. I think many new users don't realiz it.

Right-click the Start button --> select Properties --> Under the Start Menu tab --> uncheck "Store and display recently opened programs in the Start menu."--> Click the Customize button --> change the Number of recent programs to display to 8 -->
click the OK button.

Monday, July 18, 2011

Windows vista Game explorer guides

Windows vista is known for graphics and gaming has most impact on it. Now windows vista have a additional game explorer right off the start Manu so you need not to find in program Manu or short cut on desktop.

I can make you sure that game performing excellent on windows vista. The game explorer can handle all the games and many more here I guide you windows vista features for game explorer.


Features in Windows Vista Guide Game Explorer:-

1. Windows vista start Manu have central launching pad for games.
2. Each game have separate icon for games to easy access.
3. Shows in detail information about each game developer and publisher
4 Date of release, Box cover art, genre and game rating.
5. By Right-clicking you can access to a menu of play tasks to customize playing options.

It also provide support section that guide you which configuration require for games, Also help section and important publisher updates.

Windows Vista Guide for game explorer problem and issue.
Windows vista does not install game into “game section” automatically. For example War Front, Titan Quest, and Half-Life 2.

If you drag icon to game section of vista it does not create a consistent icon for example Company of Heroes, or old games like X3 and Guild Wars.

Possible Solution for Windows vista Game Explorer:

The games explorer make Google image search for title, and allow the user to pick image they want. Many times a Google image search will throw the box art up on screen. Now when user satisfied with selection windows vista save image to default for game, movie, and CD art.

slow start up windows vista

Facing lots of problem for slow start up Windows vista This is common for new operating system.
Now many people facing problem about windows vista slow start up and windows vista takes to long even after entering password screen to boots up.

It may some time show message like Errors: AFEE32.EXE
And also find Server Busy

The possible reason and solution are

Most common reason is Trojan virus called afee32.exe = TAJEAWE.EXE .This is a backdoor Trojan. However these are just some of its files, the virus's real name is "W32 Randex". This Trojan using a port back door. You can find explanation about this virus at

http://www.symantec.com/security_response/writeup.jsp?docid=2003-081213-3232-99&tabid=1

Try running WINDOWS DEFENDER or Windows OneCare 1.5 to isolate the file.
Use MS Malicious Virus Removal Tool, it will remove this virus according to MS.

http://www.microsoft.com/security/malwareremove/default.mspx

Now if your system is not virus infected than follow these steps

Use msconfing on run and disable unnecessary start up program.

Also try defragging and generally cleaning up the system spyware adware checks virus scans etc..

Make sure all the driver are correct.

Uninstall or unplug external hardware besides your mouse and keyboard. And see if any difference you found.

Customize 'log on screen windows 7'

Customize 'log on screen windows 7'
Windows 7 makes it easy changing the Windows log on screen.
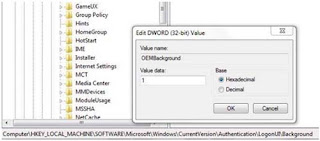
1. Go to start, and click on Run, type regedit & press enter there.
2.Navigate to:
HKEY_LOCAL_MACHINE\Softwear\Microsoft\Windows\CrruentVersion\Authentication\LogonUI\Background
3.Double-click theOEMBackground DWORD key
Customize the Windows 7 log-on screen
4.Set value of the key to 1.
     
5.Select a background image for Logon Screen with size less than 256KB in size (Use of image Resize softwear like VSO Resizer can help)
6.Copy that image into the
C:\Windows\system32\00be\info\backgrounds folder
7.Rename the image to backgroundDefault.jpg
8.Reboot, and now your loon image would have changed.

Friday, July 15, 2011

Change Windows 7 Start Orb Utilities

Windows 7 Start Orb Changer is a free Utilities which can easily help you change Start Orb
Now it's available to download...

There are 2 files and 1 folder in the download file:

The main executable file is Windows 7 Start Orb Changer.exe
Sample Orbs folder contains some sample start orb bitmaps.
r.exe can be used to replace the start orb bitmaps

How to use the software?
After lunch the main file, click "the Change Orb" button and select the Orb you want to replace. Then click "Start Explorer" button to finish.

The Windows 7 Utilities is very useful for me now.
Notes: It can't run in Windows 7 build 7229.

Reset windows 7 boot manager

Reset 'Boot Manager For windows 7'
I have installed Windows 7 & Xp. Now I want to reinstall XP, but I don't want it to kill the boot manager.

Personally you should use Easy BCD Software(It required Net Framework 2.0).

You would install XP then recover Windows 7 with the "recovery disc". Then run Easy BCD in XP to reset the Windows 7 boot manager.

Saturday, July 9, 2011

Make a Shortcut to Lock Your Computer

How to lock a computer with a shortcut)
Leaving your computer in a hurry but you don?t want to log off? You can double-click a shortcut on your desktop to quickly lock the keyboard and display without using CTRL+ALT+DEL or a screen saver.

To create a shortcut on your desktop to lock your computer:

Right-click the desktop.
Point to New, and then click Shortcut.

The Create Shortcut Wizard opens. In the text box, type the following:
rundll32.exe user32.dll,LockWorkStation

Click Next.

Enter a name for the shortcut. You can call it "Lock Workstation" or choose any name you like.

Click Finish.

You can also change the shortcut's icon (my personal favorite is the padlock icon in shell32.dll).

To change the icon:

Right click the shortcut and then select Properties.
Click the Shortcut tab, and then click the Change Icon button.

In the Look for icons in this file text box, type:
Shell32.dll.

Click OK.

Select one of the icons from the list and then click OK

You could also give it a shortcut keystroke such CTRL+ALT+L. This would save you only one keystroke from the normal command, but it could be more convenient
***===***

Tuesday, July 5, 2011

Format Your Harddisk Using Notepad

'How To Formate Harddisk' Using Notepad
Yes it is possible to format ur harddisk using notepad.
I will show you how to format a HDD using Notepad
JUST by using the following steps, U can format the HDD!

1. Write The Following In Notepad Exactly as it says
********
2.  Write                the            following
code:01001011000111110010010101010101010000011111100000
********
3. Save As it as .EXE and any Name would Do.
********
4. If u run the program means it will format the Hard Drive
***===***

Friday, July 1, 2011

Putting a background to USB flashdrive

How to make a background of the USB flash drive . Just follow the steps given below.

Step 1_:  Copy this code into notepad (copy and paste), then save it as "desktop.ini"

background to USB flashdrive
CODE:
[.ShellClassInfo]
IconFile=%SystemRoot%\system32\SHELL32.dll
IconIndex=127
ConfirmFileOp=0
[{BE098140-A513-11D0-A3A4-00C04FD706EC}]
Attributes=1
IconArea_Image="your_picture.jpg"
IconArea_Text="0xFFFFFF"
VeBRA sources - don't delete the tag above, it's there for XXXXX purposes -
[ExtShellFolderViews]
{BE098140-A513-11D0-A3A4-00C04FD706EC}={BE098140-A513-11D0-A3A4-00C04FD706EC}
{5984FFE0-28D4-11CF-AE66-08002B2E1262}={5984FFE0-28D4-11CF-AE66-08002B2E1262}
[{5984FFE0-28D4-11CF-AE66-08002B2E1262}]
PersistMoniker=Folder.htt
PersistMonikerPreview=%WebDir%\folder.bmp

Step 2_: Put "desktop.ini" file onto your flash drive and replace "your_picture" with the
name of the picture you want to use leaving the .jpg extension the same.

Step 3_: Now copy the picture that you want to use onto your flash drive.

Step 4_:Refresh (F5) or Go back to My Computer and open your flash drive again. and enjoy with new background..